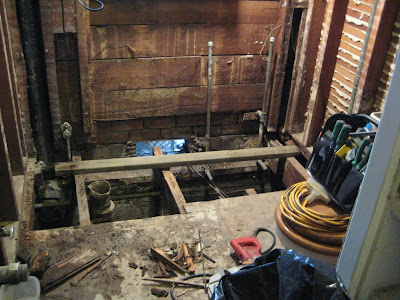
we were "here"...

dry rot wood removed, as well as the bad plumbing...
taking the morning with it...

after lunch...
the "guys" had a "pow-wow" to set their next moves...
while this was happening, I went into my bedroom...
and discovered a casualty of the dry rot removal...

it had survived a tumble yesterday...
but not today...good thing I have some Superglue...

tomorrow, I'll move these things BEFORE they get here...

R, "Tile Wizard" likes my pattern & colors...

he thinks it will look nice...very "period"...
soon I'll be picking-up the field tiles...
and any needed quarter rounds, etc...
we also did the math, measuring tapes in hand...
and he thinks, as I have thought, all along...
that I have just enough 2" hex tile sheets...
to do the entire floor...
[we need 32 sq ft...I have 33...of the discontinued 2" hex...]
we also unboxed the entire pedestal sink assembly...
and set it up to see how it would "center" on the med.cabinet...

as you can see, the plumbing is offset to the left...
it will be moved to the right, so that the sink can be centered...
the pedestal can't contain all the valves and is set out from the wall...
but the door will hide most of the plumbing...

the general went on several supply runs...
and here, is stock-piling cement backer board...
which will start going up very soon...
[it's the base for the thinset for the tile...]

he also has turned my porch into a Home Depot annex...
with all the wood for the dry rot repairs, etc...
as well as a bunch of plumbing supplies...
as tomorrow, the shower valve assembly goes in...
as well as the shower pan & bench...

so with the direction for the next couple of days set...
it was on to replacing all the dry rot damaged wood...
that R removed this AM...
here he's setting a pressure treated sill plate piece...

then on to the wall...

and scabbing the support beams...

then the floor...using tongue & groove...

and working around the now "moved-back" toilet flange...

and finally... all the puzzle pieces are in place...

and with the toilet back in place...
AND the wall & floor closed-up...
it's not nearly as cold as yesterday...
[less "out"...more "house"...]

after cleaning-up and taking away ALL sorts of boxes, etc...
the guys left for the day...to return tomorrow...
tomorrow... the shower valve, pan & bench get done...
the plumbing is moved, set & the floor is "nailed in"...
and maybe...some backer board goes up...
stay tuned...


2 comments:
Thanks for all the photos - it's interesting to watch the job progressing - oops, that's the retired engineer in me talking. I'm afraid there's a lot of women out there who don't have a clue what's behind the sheetrock on the walls. Reading this would educate them. I cringe when I watch "House Hunters" on HGTV (I admit it, I'm an HGTV addict) and they reject a candidate house because of the paint colors. The most ephemeral part of the whole thing. I have been known to go in the crawlspace of houses we were being shown - to the horror of the realtor - t take a look for myself. Once the bones are good, everything else is gravy. The bones of your house are probably very good where water couldn't get to them, from the look of the wall construction. It was indeed built to last.
...most of the under structure is heart redwood...[the 2x6's, 2x10's ] the siding the brick is up against is cedar...
there is no termite activity...just rot from the leaking plumbing...and that's fairly recent...
I did go into the partial basement...
and when the inspector told me about the redwood, I was sold...
Post a Comment